Whether it be a 50's soda machine, pinball, arcade game or jukebox--or something else that deserves to be restored, all work is of the highest quality. Here are two examples, one of a Seeburg jukebox and one of a Cavalier Coke Machine, which demonstrate the quality and detail that you will receive:
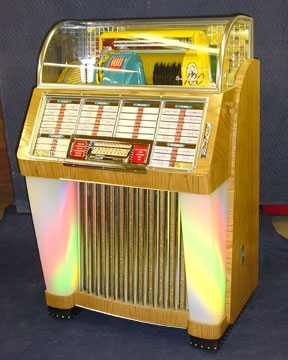
Seeburg M100C Jukebox:
This restoration started with an E-bay horror story. I had provided a good customer with a fair estimate for a restored jukebox from my collection. I didn't hear from him until one day he called with a problem. He came to talk to me in person. At my shop he tells me he is sorry he didn't get back to me, but his son said he could get a restored jukebox for less on E-bay. So he bought a "restored" Seeburg C. He drove 300 miles to pick it up, got it home, and was playing it one day when it started to smoke and burn up. Now it wouldn't work at all, and he could get no help from the E-bay seller. He wanted me to fix it.
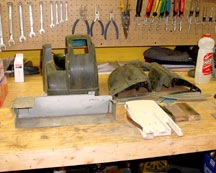
When I saw it I wondered how anyone could call his box "restored." First, it was painted ugly black. The chrome was pitted, the glass tubes were flaking, the mechanism had been horribly repainted, and there was no back cover. It had burned up because someone had jury rigged it to freeplay, and the latch solenoid had burned up taking with it most of the wires in the selection unit. Beyond that, the mechanism was caked with hardened grease, the amps were wrong (from a B model), the interior was a disaster, the entire coin mechanism was missing, a hack had tried to recap the amps, and the motor capacitor had been replaced by incorrect ones hanging below the mechanism frame--to name a few problems. It needed a total restoration, cosmetic, mechanical and electronic. He wanted it to be right, so we started from scratch. (A costly lesson in E-bay "buyer beware!")
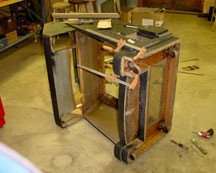
Here it is with everything out, and the cabinet being stripped and repaired. (Photos are taken of the entire restoration.) Much of the lower wood had to be replaced or repaired due to rot. While the cabinet is being worked on the amp and selection receiver got rebuilt, and the ripped speaker was sent off to be re-coned. The electrical selector was disassembled, cleaned and all of the burned wires were replaced. The housing was stripped of all parts so it could be re-chromed, and all the other chromed parts were stripped and sent to be re-plated. The curved glass frame was taken apart, and all aluminum parts were sent out and stripped of old anodizing, returned and sanded and polished to like new, and re-anodized. New chrome tubes, embossed foil, locks, trim, labels, caps, and all the other necessary parts were also ordered.
These are the mechanism covers after being stripped. All cracks have been repaired and they have been sanded, and they are being prepaired for new paint. Wood pieces that had to be repaired can also be seen.
Here are some of the mechanism and frame pieces being wet sanded and prepaired for new paint. The record rack gets bead blasted and prepped before getting new paint, to insure there is no binding from too many layers of paint.
This is the mechanism in one stage of cleaning. It must be partially dismantled to clean all the caked grease from years of accumulation, there is no other way to insure it is done right. All the contacts are cleaned, including the pins and components in the selector block. On reassembly, everything is properly lubricated and checked for proper adjustment. Dismantling the mechanism also allows the pickup arm to be removed and repainted properly.
Once all repairs are done to the cabinet and everything fits, new oak veneer is carefully applied. Critical attention is paid to all seams, edges, and cut outs (especially the tube holes--some restorers haven't mastered this) insuring nothing is missed. The quality of this work is critical for a first class restoration! (We have all seen examples of poor craftsmanship in this area, it is not something you want to live with.) The new veneer is then stained in a pleasing golden oak color and finished with two coats of polyurethane for durability. Finally, everything is masked off and the interior gets a new coat of paint for a finishing touch.
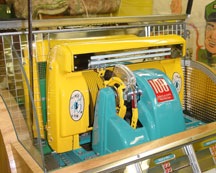
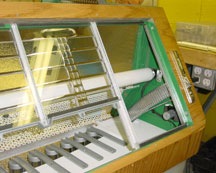
Now we can begin the process of reassembly. New chrome tubes are installed with freshly painted spoons having new pads and edging. The pilasters are fit and secured, and the rebuilt animation assembly and new color tubes and lamps are installed. New embossed foil is carefully cut to fit as original and cemented inside the cabinet. All the other associated parts are fit and finally the mechanism supports and frame are installed. The re-anodized top frame and glass and mirrors are also fit at this time.
Finally the mechanism goes in. It has been throughally lubed, tested and all contacts and mechanical adjustments have been made on the bench before it is put in. It is in factory new working order now. The amp and selection receiver have also been cleaned, repaired and installed, the re-coned speaker replaced, and the electrical selector cleaned, adjusted and reassembled on its newly chromed frame. A complete original coin mechanism was located, and after a complete disassembly and rebuild (because of heavy corrosion and filth) it went in, with the remaining chrome and brightwork following. Finally, a solid state free play adaptor (requiring no modifications to any original components) and grounded ac cord were installed, to insure noting burnt up again. It has taken many hours of work, but we now have a working jukebox!
These two pictures give you an idea of the detail involved. Note the wood grain on the cover of the coin box. It perfectly matches the surrounding grain on the side panel. This is because it was cut right out of this single piece of veneer, not pieced in as most places do. And the black kick panel covering is Tolex--the correct grained fabric as used on vintage electronic and radio cases, and not cheap vinyl. Also note in the other picture the detail behind the front panel. The spoons holding the chrome tubes are like new, and even the aluminum coin tube is polished!
So this is it! Yes, my customer would have been much better off starting with a solid unrestored machine (for a fraction of the price he paid for his "restored" machine on E-bay), but still, BECAUSE THIS RESTORATION WAS DONE RIGHT, he still ends up with an excellent investment that is still worth about what he has in it--and will just continue to go up in value. (That can't be said for "restorations" that are poorly done.)
And my gosh does it sound good--and bring back the memories!
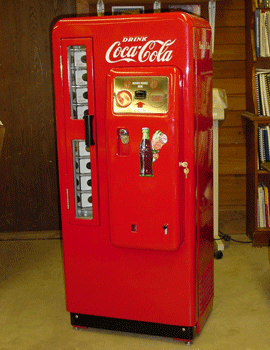
Cavalier Coke Machine:
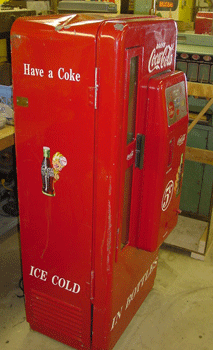
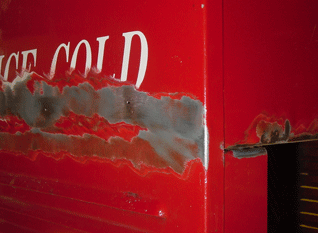
This project began with another example of what some shops call a "restoration." Except for the large dent in the top (caused by my customer's recent move) this machine looks really good. But looks are deceptive.
This gentleman called one day asking me to come look at this machine because it was leaking all over the carpet, and he wanted to know if I could fix it. After a quick look, my answer was yes--but it wasn't going to be quick. I had to tell him that whoever "restored" his machine had simply repainted it and applyed new graphics--none of the rust had been repaired and nothing had been done to the interrior. It was ruining his carpet because condensation was leaking out numerous holes rusted through the floor of the cabinet.
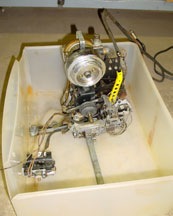
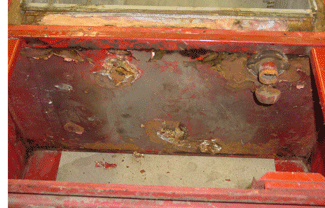
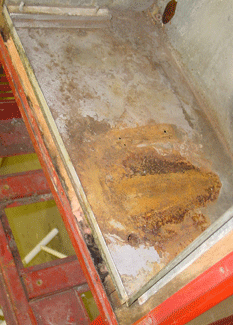
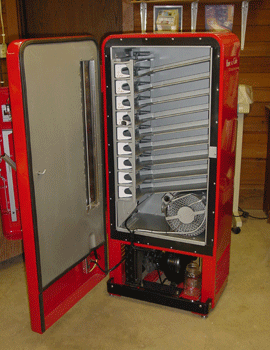
This is what the bottom of the cooling cabinet looked like (photo taken after the compressor was removed in my shop). You can clearly see large holes. No wonder it leaked.
To make matters worse, the floor of the inner compartment was also rusted through, and there were areas around the exterrior where rust was coming through the paint as well.
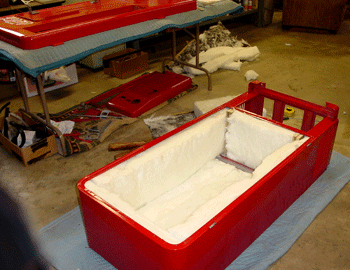
The only way this could be "fixed" was to strip down the entire machine and perform a complete restoration. Once in the shop, that is what entailed. The entire machine was disassembled, stripped and sandblasted. Both floors were cut out, new floors were custom fabricated from sheet metal and welded into position. The rust holes in the sides were cut out and patched with sheet metal and seam welded. The large dent was hammered out and heat shrinked into original form. Once all the metal repairs were completed, the interrior was seam calked, metal treated and an epoxy primer was applyed to insure no future rust. Then, after it was determined that the door fit properly, necessary body work was performed on the exterrior, then block sanded and epoxy primed. The primer was block sanded again to insure it was straight, then it was followed by one more coat of primer. After final sanding, the entire cabinet was painted inside and out with Dupont Centari Acrylic Enamel with Gloss Hardner for holdout and durability.
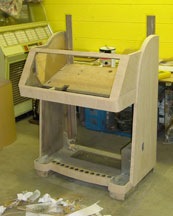
While all this was taking place, the compressor unit was tested to isnure it operated efficiently. If necessary it would have been repaired or replaced, but in this case it only needed a through cleaning, new wiring and repaint. To this end the entire unit was disassembled, the fans and wiring were removed and the hermetically sealed unit was bead blasted. It was then repainted, a new fan was installed, and it was completely rewired with a new solid state starting and overload unit. A new thermostat was installed, and as a final touch, the aluminum cover for the evaporator was polished prior to installation.
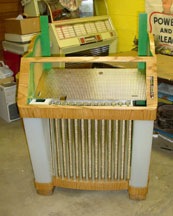
At the same a new coin entry plate, opener, coin return knob, emblems, decals, rubber, feet and other needed items were ordered, and the coin mechanism was rebuilt. The bottle rack was disassembled and all the bottle collars were removed, bead blasted and repainted white as original. Even the red Have a Coke decals were applied. The rack and shelves were repainted, and then everything was reassembled and tested. The inner cabinet (with its floor replaced) was blasted, calked, primed, sanded and painted. With everything ready, new insulation was fitted and reassembly began.
It goes fairly quickly now. Once the inner cabinet is in place, new black plastic trim panels are cut and polished, then installed with stainless steel screws to eliminate future rust. The main door is fit with new insulation, the wiring is run, and the inner door cover (in fresh paint) is fit with new rubber seals and stainless steel screws. The small door (having been painted at the same time as the cabinet) is detailed with new brightwork and stainless screws, and fit to the main door. The bottle door, also having been repainted, is reassembled with new glass, insulation, hinges and handle and fit with stainless screws. The bottle rack and shelves complete the interrior.
Finally the kick panel is reinstalled, the Coca-Cola logo is hand painted and the remaining graphics are applied. After a few days of run-in to insure the machine iss problem free, it is ready to return home. It is now as good (or better) than the day it came from the factory, and no longer will it pose a threat to the carpet.
The lesson learned? If you have a 50 year old machine and you haven't had it properly restored, I GUARANTEE if it isn't leaking now, it WILL. I have never seen a machine that isn't rusting from the inside out. Consider that the manufacturers never spent much effort protecting the inside, because it isn't seen. And they never intended these machines to be in daily operation more than 50 years later! If you don't take it apart and fix the rust, it WILL fix you.
And now that it is restored to as good or better than the day it came from the factory, don't you enjoy the taste of Coke from those cold little 8oz. glass bottles? There is something about the taste of beverages from glass bottles. Plastic and cans don't come close! Enjoy!